After seeing the final images and what I have been able to achieve, I am very impressed and proud of myself. I didn't know this could be achieved in 3DS Max and it has definitely encouraged me to carry on using 3DS Max to explore the other tools that are available to me.
I came across many problems whilst doing this project. Firstly time was a massive issue as I was rushed and could not put 100% of my effort in. I know I could have made it much better and I am disappointed in myself because of this. I also had many problems with welding through out the process of making the head. On many occasions I forgot to weld or the welding would not work properly. I managed to sort it out in the end though. I also had a major problem at the beginning of the project when I had to start again with drawing the lines onto the template. This was a big pain because I had to go back and spend more time on something I had spent weeks on already only to find it was wrong. However, by going back and starting again I probably saved myself from many future problems.
My favourite part of the model is definitely the nose because it looks a lot like my nose and it was very simple to make and modify. My least favourite part of the head is the hair and the eyes. I could have spent a lot more time perfecting the eyes because I think they are my best feature. The hair was also very hard to do even though I know I can achieve better than the current end result. I am probably going to carry on with this project to see how many improvements I can make to it.
I have learnt many new skills from this project which I can use in the future. The main thing I have learnt in 3DS Max is how to use the Unwrap UVW modifier. This was a major part of my project and I have never used the tools before. I will be practicing more with using this tool because I thoroughly enjoyed it.
Friday 22 October 2010
Final Images
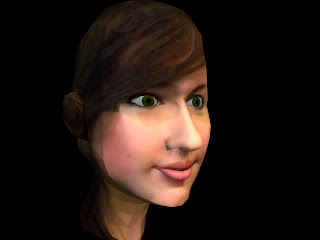
This is a close up of the front of the face.

This is the left side of the face.

This is a full version of the front of my face.

This is the right side of my face.


This is the left side of the face.

This is a full version of the front of my face.

This is the right side of my face.

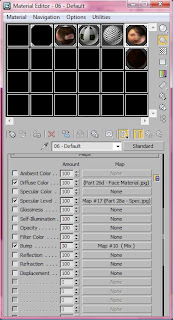
Adding Bump and Specular Effect
Creating the bump effect was quite easy. I used the material of my face to make an embossed effect in Photoshop and then put it onto the material to create a better effect of the face. The picture below shows the face with the material and how it was achieved. I also used the noise feature to make my face look a little more realistic.
This is the embossed looking picture that I created to go on the material. It is very faint but there are small black lines in the picture.

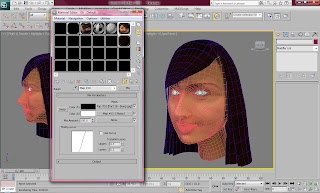
To create the specular effect I had to use Photoshop again and paint 'lighten' lines along the face where a shine needs to appear. I applied the picture onto the specular part of the material map to give the face more of a shine in the right place.
The picture below shows the picture I used to create a shine effect on the face.
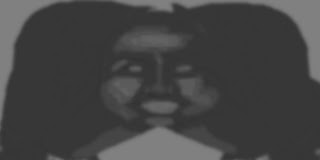

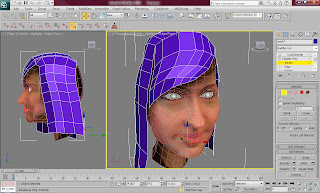
Hair
The hair was very difficult. I considered using the hair and fur modifier but considering I have very long and styles hair it would be easier and save a lot of time to make hair out of polygons. I started at the parting of my hair and made the sides by using the shift key. I then made the fringe which was the hardest part because my hair has a distinct shape to it. I then joined it at the back and arranged the shape of the hair a little better.
I then made the material for the hair. It needed it to look slightly brown as well as black. For this I used the marble effect to make sure that my hair looked like it had a blend of different colours. I set the values of this very high as I didn't want my hair looking too patchy

I made sure that the hair looked at thick as possible by making 4 different versions of this shape and then making each of the ends of the hair go in different directions. I know that the hair could look so much better than this but because of my time scale I wasn't able to make it as well as I would like to.

Texture Painting
Once I got the template into Photoshop I applied a temporary mark to make the lines thickened on the template in order to create a reference plate for creating my face. I used the original picture that I used for the first template on the planes. I then individually cut each part out of the pictures and placed them on the grid template and put them in place.

I used the warp and distort tool many times to make sure that the details of the face were put in place properly. I also used the stamp tool and smudge tool to make sure that each part of the face blended and looked right.
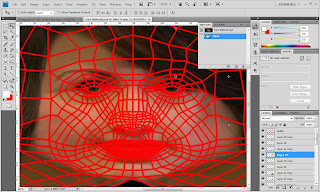
This is how the end result looked after a long time of cutting pasting and warping. It did not come out right first time or the second time... or several times after that. But after much practice I eventually got the hang of it.
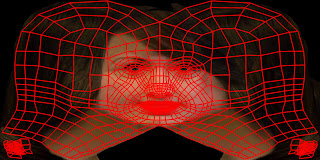
This is the final material picture that will be used on my model. I had to make sure that the face blended well. The hardest part was the eyes because they would not get in place no matter how many times I made them small and stretched them and warped them.
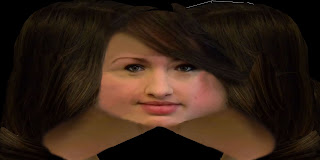
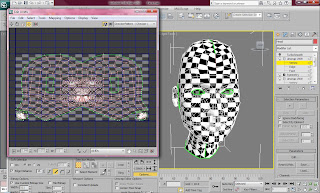
This is what the material looked like after it was applied to the model. It need lots of tweaking at this point because it does not look very much like my head. But I am very impressed with what I've been able to achieve so far.

I used the warp and distort tool many times to make sure that the details of the face were put in place properly. I also used the stamp tool and smudge tool to make sure that each part of the face blended and looked right.

This is how the end result looked after a long time of cutting pasting and warping. It did not come out right first time or the second time... or several times after that. But after much practice I eventually got the hang of it.

This is the final material picture that will be used on my model. I had to make sure that the face blended well. The hardest part was the eyes because they would not get in place no matter how many times I made them small and stretched them and warped them.

This is what the material looked like after it was applied to the model. It need lots of tweaking at this point because it does not look very much like my head. But I am very impressed with what I've been able to achieve so far.

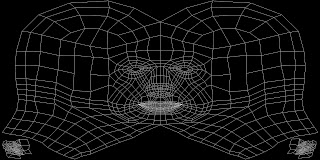
Editing and unwrapping UVW Map
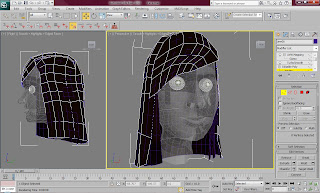
Before I edited the UVW map I had to make sure that the poly did not need any editing. I moved some of the points around and made sure all the vertexes were welded properly. I then selected the Unwrap UVW on the modifier panel and clicked on ignore back facing to make sure that it does not ignore the back vertexes because these were needed. I selected the whole head except for the ear and I clicked on cylindrical and moved the cylinder to make sure it fit the head properly and to make sure that the border was in the right place and selected.

I then clicked on edit to edit the UVW map. I used the range tool to spread out the vertexes and make sure the polygons were all a good shape. I also had to make sure that there was no inverted vertexes. This was very important so I made sure I spend a good long time on this. I found this easier than expected because I thought I would have to individually move each vertex.
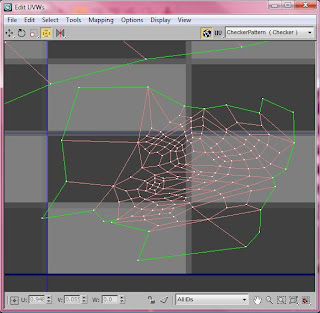
I then had to do the ear. I selected the ear and made a few extra seams as the ear is quite complex and needs to be pulled open. I used the pelt tool for this which came in very useful and unwrapped the ear. I made sure that each vertex was appropriately spaced out. This was quite easy but difficult to set the seams as I did not know where to put them or what they would do as it's the first time I've used this tool.
I then applied a new unwrap UVW modifier to the poly above the symmetry modifier to unwrap the mirrored side. This was lot simpler to do as I had already unwrapped the first half of the head. I simply mirrored the first half to make the mirrored half. I had to weld the seams together of both of the half's of the face. I thought this would be very easy to do because I've done it many times before. However, when I tried to weld the tool wasn't doing anything. This was very frustrating but I managed to use the target weld tool instead which worked really well.
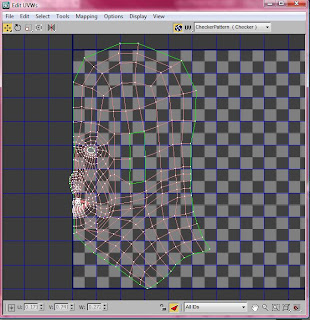
The image below shows how the unwrapped UVW map looks like. I had to render it because I would need to use this as a template in Photoshop to create the material for the skin and face.

I then clicked on edit to edit the UVW map. I used the range tool to spread out the vertexes and make sure the polygons were all a good shape. I also had to make sure that there was no inverted vertexes. This was very important so I made sure I spend a good long time on this. I found this easier than expected because I thought I would have to individually move each vertex.

I then had to do the ear. I selected the ear and made a few extra seams as the ear is quite complex and needs to be pulled open. I used the pelt tool for this which came in very useful and unwrapped the ear. I made sure that each vertex was appropriately spaced out. This was quite easy but difficult to set the seams as I did not know where to put them or what they would do as it's the first time I've used this tool.

I then applied a new unwrap UVW modifier to the poly above the symmetry modifier to unwrap the mirrored side. This was lot simpler to do as I had already unwrapped the first half of the head. I simply mirrored the first half to make the mirrored half. I had to weld the seams together of both of the half's of the face. I thought this would be very easy to do because I've done it many times before. However, when I tried to weld the tool wasn't doing anything. This was very frustrating but I managed to use the target weld tool instead which worked really well.

The image below shows how the unwrapped UVW map looks like. I had to render it because I would need to use this as a template in Photoshop to create the material for the skin and face.

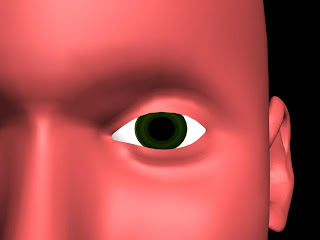
Making the Eyes
The eyes were quite easy to make as I simply made a sphere and turned it into an editable poly. Mirroring the other eye was the most difficult part. Firstly I made a sphere and made sure it was the right shape by adjust thing the size and squashing it in many places using the scale tool. I Then went onto material editor and began making the material for the eyes.

For the material I selected multi/sub-object option because this allowed me to make sure each colour of the eye was considered. I made a black colour for the pupil and a grey colour of the whole eye. These were very simple to do.

I then had to make the green colour of my eye. I have dark green/yellowy eyes which means I needed something which would show this colour. I chose the marble option as this allowed me to create the effect of the colour of my eye. I made it as best as I could because it was very hard to make sure it was the exact colour of my eyes. I chose two different colour of green and yellow to make a blend.
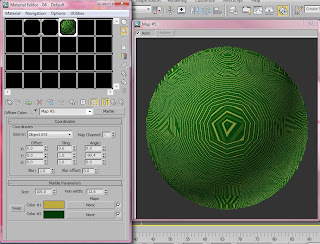
I was very happy with the end result after I applied set the polygons ID's individually to match the ID's on the material. The eyes look very similar to the colour of my eyes. The rendered image is shown below.


Subscribe to:
Posts (Atom)